Examining JS Frameworks/Libraries - React
You’ve probably heard all these framework/library names thrown around and wondered where the heck to start. In the next couple posts I am going to explore a couple of these frameworks/libraries by building a simple weather app with each one. You may also be wondering why I’m being annoying and overslashing (frameworks/libraries). A framework usually provides an environment or structure you can build on, while a library provides you with tools you can build with.
This past week at HackReactor we’ve been diving into a couple of these frameworks/libraries and I thought that in addition to this helping me solidify my understanding of them, seeing example code can hopefully help others picking up these frameworks/libraries explore what makes each one unique and when/why you may want to use one over the other depending on your project. Let’s get started with React below.
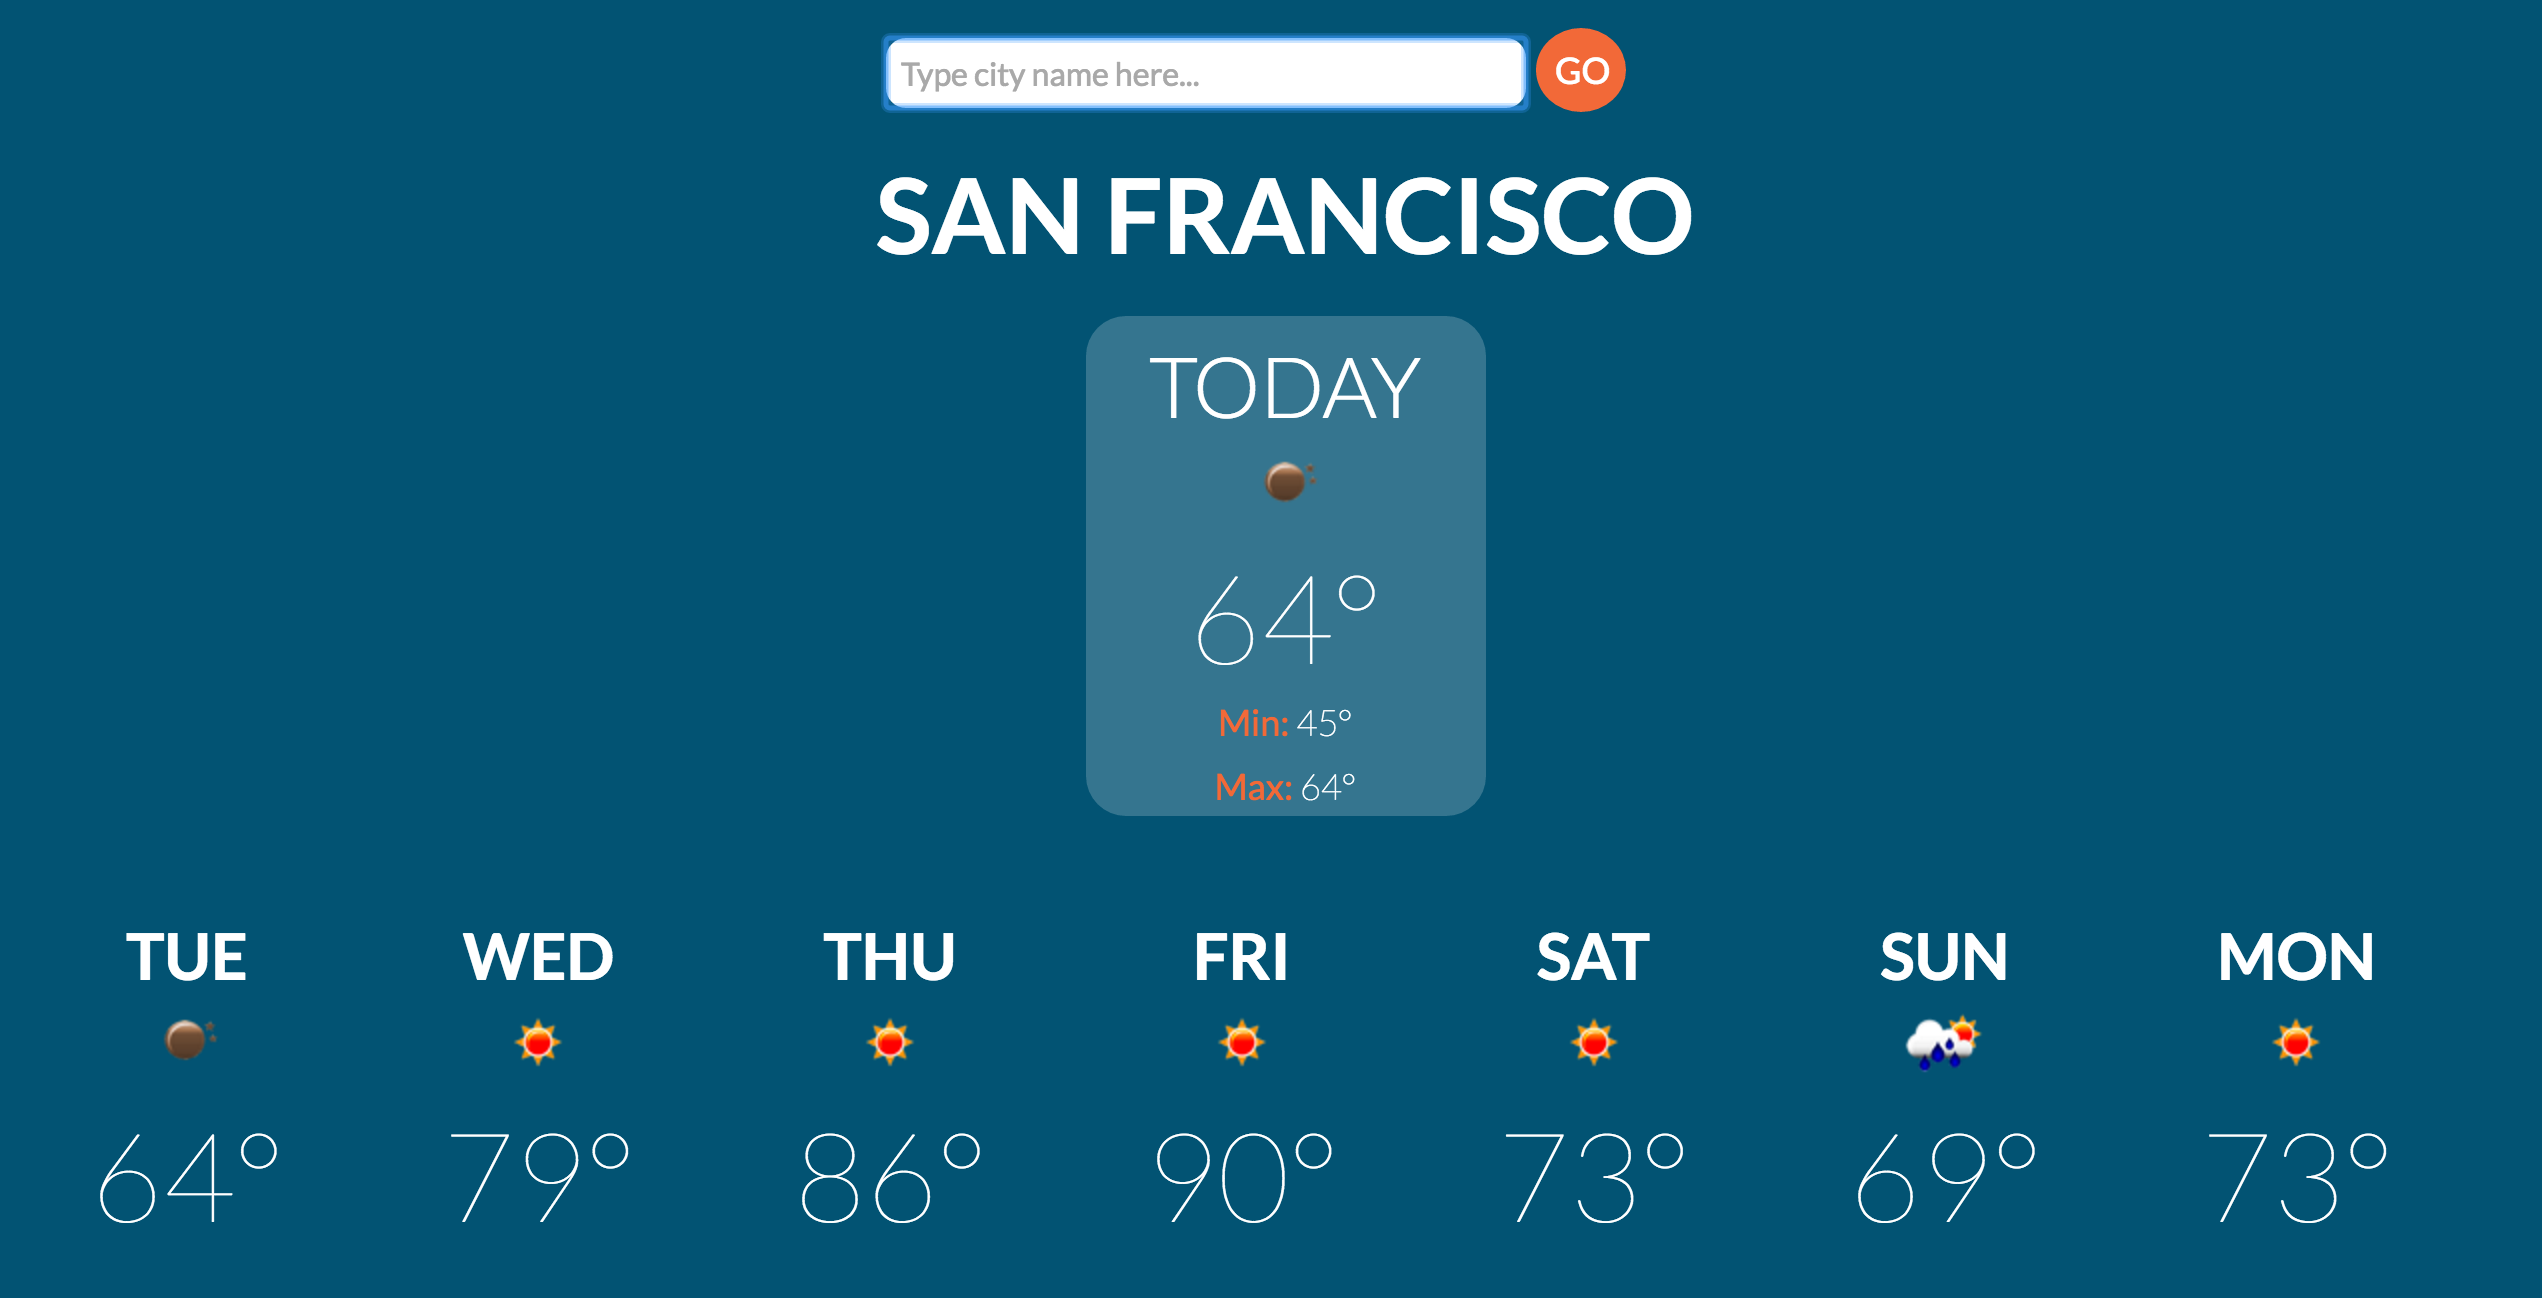
Here’s what we’ll be building - react weather app.
You can checkout the code here.
React, unlike Backbone or Angular, is a library, not a framework. It’s a toolkit that abstracts certain layers (namely the DOM) to make it easier to create interactive UIs. If you are wondering how it fits into MVC (Model View Component) frameworks, as it notes in the documentation, “Many people choose to think of React as the V in MVC”. React breaks down the user interface into components and subcomponents that render HTML. Instead of re-rendering the entire DOM everytime data changes, React is able to detect which parts of your DOM contain the changed data and re-render only those components.
Components
You can think of it as an assembly line - each component should just be concentrating on one single thing. One way you may decide what components are necessary is to consider what information or data you will be presenting. In our weather app we’ll be presenting today’s weather as well as the week’s weather. Just based on that we can assume we’ll be having at least two components. Can we break that down further?
Well, let’s see:
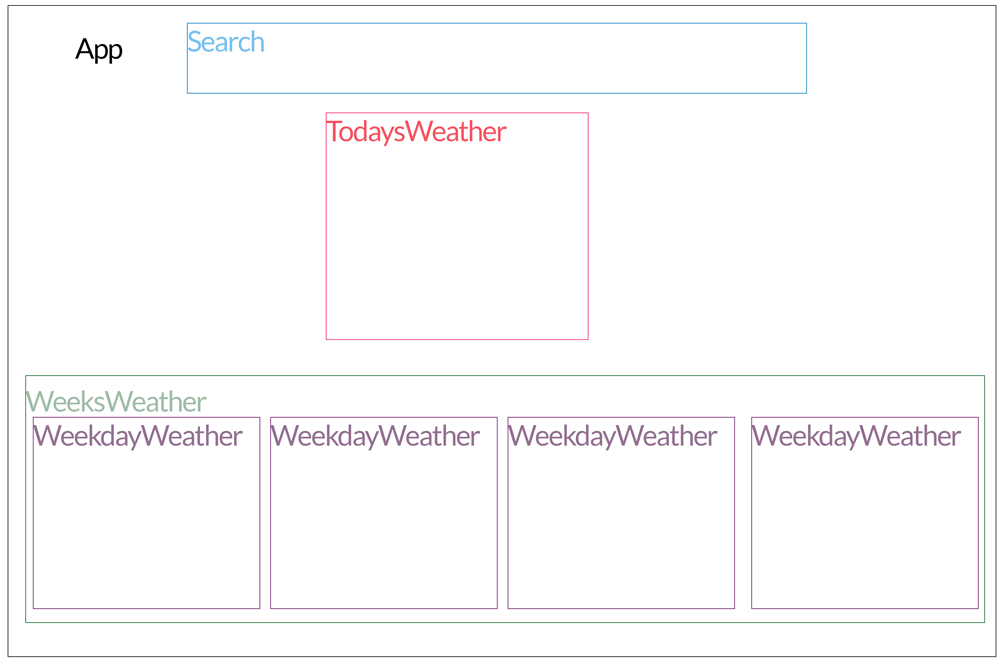
Now that we know what components we need, let’s create them. Here’s a quick outline:
- ‘App’ - will render ‘Search’, ‘TodaysWeather’, and ‘WeeksWeather’
- ‘Search’ - will render an input element for users to search weather by city and a button to submit their input
- ‘TodaysWeather’ - will render the weather information for today only
- ‘WeeksWeather’ - will render a list for the week’s weather
- ‘WeekdayWeather’ - will render the weather information for a specific day of the week
We’ll be creating each of our components using ES6 and JSX- it allows us to reference our components like we would any regular HTML element - writing each in a seperate file that will be compiled by Babel into code that will be compatible across browsers.
App.jsx
  var App = () => {
      return (
          <div>
              <div>
                  <Search />
              </div>
              <div>
                  <TodaysWeather  />
                  <WeeksWeather  />
              </div>
          </div>
      )
  }
Search.jsx
  var Search = (props) => {
      return(
          <div id='search' className='clearfix'>
              <input type='text' placeholder='Type city name here...' />
              <input type='submit' value='Go' />
          </div>
      )
  }
TodaysWeather.jsx
  var TodaysWeather = () => {
      return(
          <div>
              <h2>City Name</h2>
              <div id="todaysWeather">
                  <h3>Today</h3>
                  <img />
                  <div className='mainTemp'></div>
                  <div className='minTemp'><span className='orange'>Min:</span> </div>
                  <div className='maxTemp'><span className='orange'>Max:</span> </div>
              </div>
          </div>
      )
  };
WeeksWeather.jsx
  var WeeksWeather = () => {
      return (
          <ul id='weeksWeather' className='clearfix'>
              <WeekdayWeather />
              <WeekdayWeather />
              <WeekdayWeather />
          </ul>
      );
  };
Each of these components is returning some HTML to structure our app. You can probably start to see why React is popular - if you’re a front-end developer, it probably all looks very familiar. Components are structured as functions that return HTML, and JSX allows you to write the HTML just as you normally would. Without it, our ‘App’ component would look more like this:
  "use strict";

  var App = function App() {

      return React.createElement(
          "div",
          null,
          React.createElement(
            "div",
            null,
            React.createElement(Search, null)
          ),
          React.createElement(
            "div",
            null,
            React.createElement(TodaysWeather, null),
            React.createElement(WeeksWeather, null)
          )
      );
  };
It no longer looks as familiar and is less intuitive.
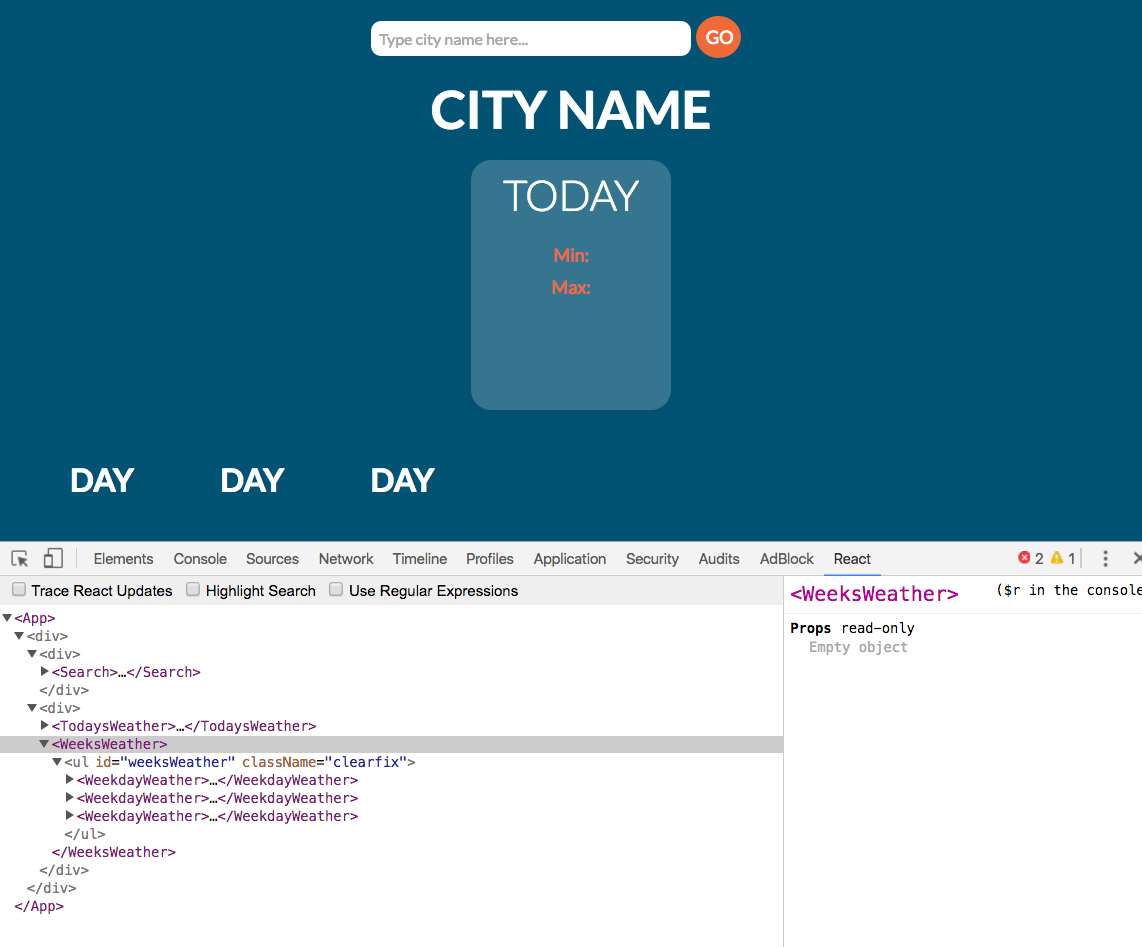
Within ‘index.js’ we use ‘ReactDOM.render(component, DOM Element)’ to render our ‘App’ component onto the screen by adding the following line:
index.js
ReactDOM.render(<App />, document.getElementById('app'));What we get is something like this:
STATE & ‘PROPS’
Now that we have our app’s structure set, we can start to think about the data. React allows us to keep track of our data’s state using, well, class ‘states’. Any component can be made to have a state, but you want to be strategic about it. React refers to the parent component - in this case ‘App’ - as the owner and the components it renders - ‘Search’, ‘TodaysWeather’, and ‘WeeksWeather’ - as the owned or children. We can start to think of the structure as a tree where data flows one way - from owner to children. The owner component is able to pass along data to it’s child components using ‘props’ which we’ll soon see.
Let’s refactor our ‘App’ component into a class:
App.jsx
  class App extends React.Component{

      constructor(props){
          super(props);

          this.state = {
              'weeksData': window.initialData,
              'todayData': window.initialDataObj
          }
      }

      render() {
          return (
              <div>
                  <div>
                      <Search />
                  </div>
                  <div>
                      <TodaysWeather today={this.state.todayData} />
                      <WeeksWeather week={this.state.weeksData} />
                  </div>
              </div>
          )
      }
  };
Remember that owner components such as ‘App’ can pass down data through ‘props’ or properties. Above we see that ‘props’ allow ‘TodaysWeather’ to have access to the ‘today’ attribute passing along data for today’s weather and ‘WeeksWeather’ to have access to the ‘week’ attribute passing along data for the week’s weather. ‘props’ often resemble HTML attributes.
For those who have already picked up ES6, this class structure will look pretty familiar. Now that we have ‘App’ extending from ‘React.Component’ we have access to ‘state’. I’ve gone ahead and added some test data that we’ll use before adding the OpenWeatherMap API.
We also now have a ‘constructor()’ function. This function gets called once, upon ‘App’ component’s instatiation and is where we set up our ‘state’. We also see a new keyword, ‘super’, that is used to call the constructor of the parent class - in this case ‘React.Component’. For those of you familiar with pseudoclassical instatiation, it may be helpful to think of it as follows:
  constructor(props){
      // this = Object.Create();
      super(props); // React.Component.call(this, props);

      this.state = {
          'weeksData': window.initialData,
          'todayData': window.initialDataObj
      };

      // return this;
  }
Now we can take a look at how the child components use this data that is being passed down to them. When we get data back from OpenWeatherMap API, the temperatures come back in Kelvin, so I’ve gone ahead and added a function to convert Kelvin to Farenheit. Using curly braces - {} - we’re able to interpolate Javascript into the HTML we’ll be returning.
Below, we’re extracting five pieces of information from the the data being passed through to ‘TodaysWeather’. We’re getting the city name (within the <h2></h2>), the image, the main temp for the day, the min temp, and the max temp.
TodaysWeather.jsx
var TodaysWeather = ({today}) => {
var farenheit = function(K){
var f = (K-273.15)*1.8000 + 32;
return Math.round(f);
};
return(
<div>
<h2>{today.city.name}</h2>
<div id="todaysWeather">
<h3>Today</h3>
<img src={`http://openweathermap.org/img/w/${today.list[0].weather[0].icon}.png`} />
<div className='mainTemp'>
{farenheit(today.list[0].temp.day)}°
</div>
<div className='minTemp'>
<span className='orange'>Min:</span>
{farenheit(today.list[0].temp.min)}°
</div>
<div className='maxTemp'>
<span className='orange'>Max:</span>
{farenheit(today.list[0].temp.max)}°
</div>
</div>
</div>
)
};What about with ‘WeeksWeather’? Instead of hardcoding in seven ‘WeekdayWeather’ elements (shown commented out below), we can use map() to loop through the data. The map() function loops through a collection (our data) and one by one passes an item from that collection to a callback function. This is especially handy when you aren’t sure of how many items your data might come back with. You can see it being used below:
WeeksWeather.jsx
  var WeeksWeather = ({week}) => {

      return (
          <ul id='weeksWeather' className='clearfix'>
              {week.map((day) =>
                  <WeekdayWeather day={day} key={day.dt} />
              )}
              <!-- <WeekdayWeather day={week[0]} /> -->
              <!-- <WeekdayWeather day={week[1]} /> -->
              <!-- <WeekdayWeather day={week[2]} /> -->
              <!-- <WeekdayWeather day={week[3]} /> -->
              <!-- <WeekdayWeather day={week[4]} /> -->
              <!-- <WeekdayWeather day={week[5]} /> -->
              <!-- <WeekdayWeather day={week[6]} /> -->
          </ul>
      );
  };
‘WeekdayWeather’ then uses the data passed to it from ‘WeeksWeather’ and extracts the information it needs - day of the week, day’s temp, and an icon of that day’s weather. The day of the week comes back as a timestamp. The ‘getDay()’ function converts it to the corresponding day of the week for us.
WeekdayWeather.jsx
var WeekdayWeather = ({day}) => {
var farenheit = (K) => {
var f = (K-273.15)*1.8000 + 32;
return Math.round(f);
};
var getDay = (d) => {
var day = new Date(d * 1000);
var numDay = day.getDay();
var days = ['Sun', 'Mon', 'Tue', 'Wed', 'Thu', 'Fri', 'Sat'];
return days[numDay];
};
return(
<li>
<h4>{getDay(day.dt)}</h4>
<img src={`http://openweathermap.org/img/w/${day.weather[0].icon}.png`} />
<div className='mainTemp'>
{farenheit(day.temp.day)}°
</div>
</li>
);
};And look at that! We have a seemingly functioning app that’s loading our test data.
Before moving onto the search we’ll implement the API, but even before that, let’s take a look at our data flow:

Apologies for the handwriting. I often use diagrams or drawings to help me understand how I want to go about implementing something.
API Integration
Now, in a separate file we’ll create a function responsible for shooting off our calls to the API.
gatherWeather.js
  var gatherWeather = (city, callback) => {
        $.get('http://api.openweathermap.org/data/2.5/forecast/daily', {
            appid: 'YOUR_API_KEY_HERE',
            q: `${city},us`
        })
        .done((data) => {
            if(callback){
                callback(data);
            }
        })
        .fail(({responseJSON}) => {
            responseJSON.error.errors.forEach((err) =>
                console.error(err)
            );
      });
  };
So we have our app’s structure down and we have this function set and ready to make calls to the API - how dow we connect these? How did we pass along data before?…‘props’!
We can go back to where we instantiated ‘App’ initially and give ‘App’ access to the ‘gatherWeather()’ function we just created.
index.js
  ReactDOM.render(
    <App gatherWeather={window.gatherWeather} />,
    document.getElementById('app')
  );
Now ‘App’ has access to ‘gatherWeather()’ and can invoke it anytime it needs to make an API request. Within ‘App’ let’s create a method, ‘getWeather(city)’, that does just that - when invoked it calls ‘gatherWeather()’ which we now have access to through ‘props’.
App.jsx
  getWeather(city){
      this.props.gatherWeather(city, (data) => {
          this.setState({
            'weeksData': data.list,
            'todayData': data
          });
      })
  }
What’s with the ‘this.setState()’ method? Well, just as ‘App’ was able to access ‘state’ after we refactored it, it is also able to access ‘setState()’. This method is used to update the info within ‘state,’ and React, once it sees ‘setState()’ was invoked, invokes the ‘render()’ method within ‘App.js’. What’s great is that you don’t have to worry about then letting ‘App’’s children know that the data has changed, React does that for you.
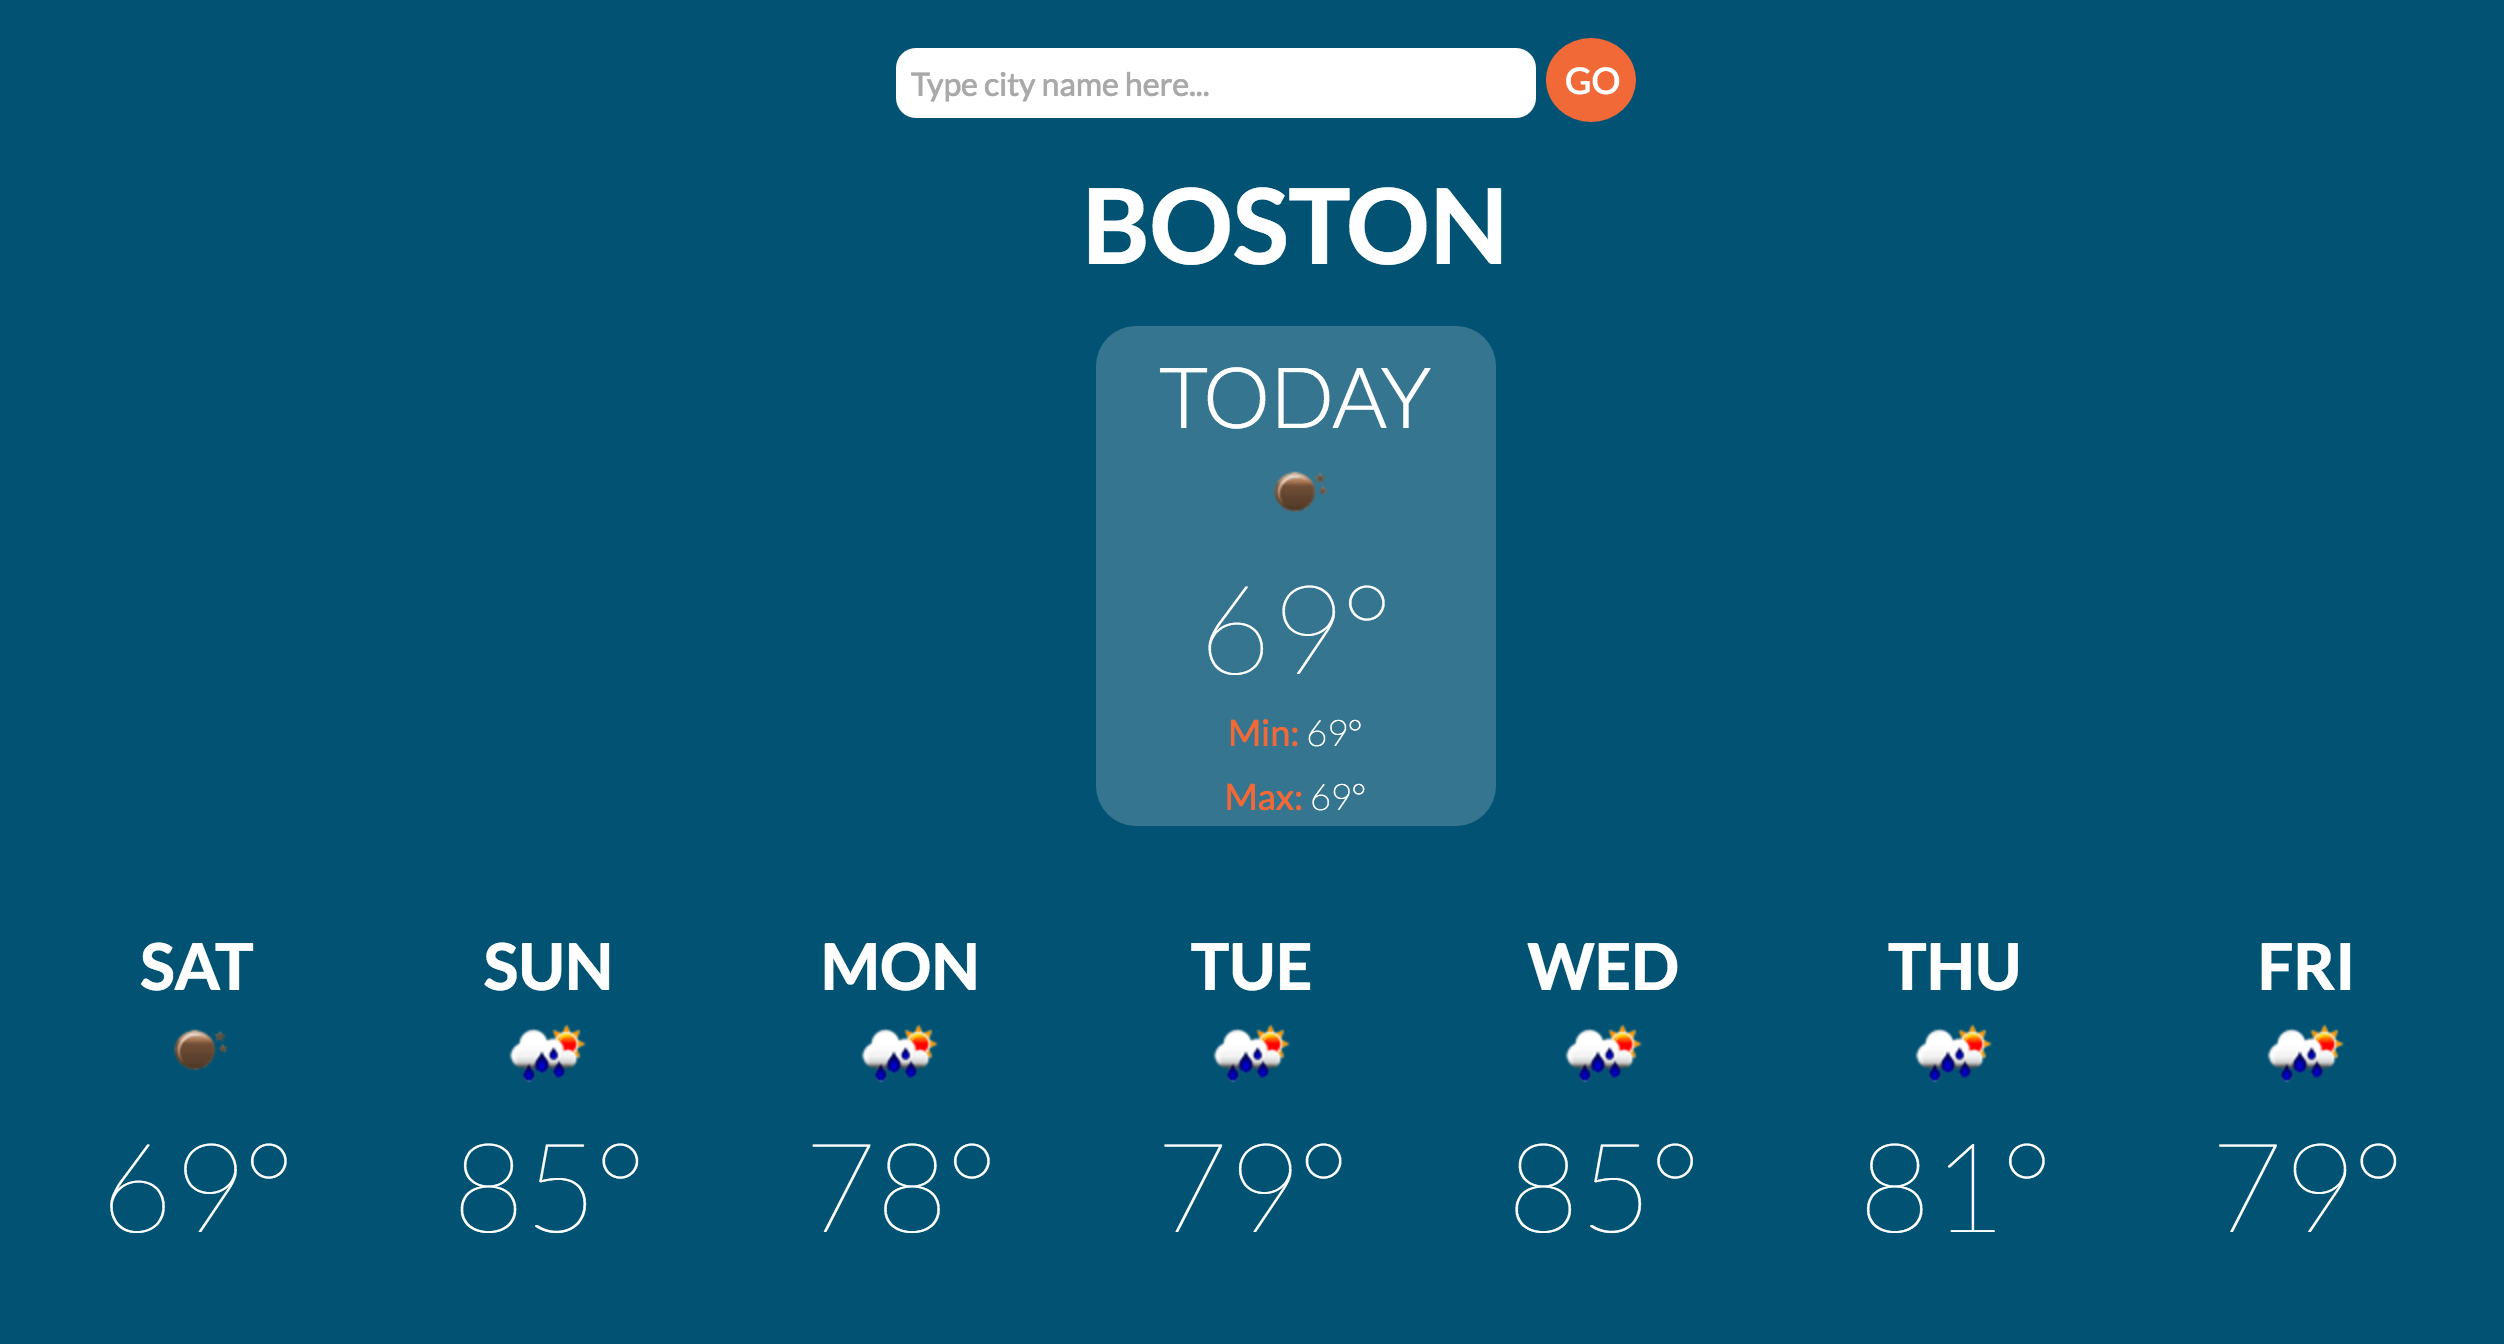
One last note here. Before we had initialized our sate with dummy data, but now that we have our API set up, we can go back and change that. Our ‘App’’s state will initiate as null, as there initially is no data before any API requests. So how would we get our first API request sent out?
React offers a couple methods that check on whether components have been ‘mounted’ or rendered. I went ahead and used ‘componentDidMount’ which is invoked immediately after our ‘App’ component renders. Within ‘componentDidMount’ I asked that it invoke ‘getWeather’ and passed in a value for city of ‘Boston’.
App.jsx
  class App extends React.Component{

    constructor(props){   // 1
        super(props);

        this.state = {
            'weeksData': null,
            'todayData': null
        }
    }

    componentDidMount(){    // 3
        this.getWeather('Boston');
    }

    getWeather(city){   // 4
        this.props.gatherWeather(city, (data) => {
            this.setState({
                'weeksData': data.list,
                'todayData': data
            });
        })
    }

    render(){
        if(this.state.weeksData && this.state.todayData){  // 5
            return(
                <div>
                    <div>
                        <Search getWeather={this.getWeather.bind(this)}/>
                    </div>
                    <div>
                        <TodaysWeather today={this.state.todayData} />
                        <WeeksWeather week={this.state.weeksData} />
                    </div>
              </div>
        )
      }else{  // 2
          return (
              <div>
                  <div>
                      <Search getWeather={this.getWeather.bind(this)}/>
                  </div>
              </div>
          )
      }

    }

  }
Let’s run through what happens real quick. I’ve numbered each step above. (1) When we initializ ‘App’ we set our state to null as there’s no data yet. (2) Within render we check to see if there is any data set in our state - if there is not then let’s just render our search component. (3) ‘App’ component having been rendered, or mounted, ‘componentDidMount’ is invoked which in turn invokes ‘getWeather(‘Boston’). (4) ‘getWeather’ shoots off an API request and we set our state with the new data that’s come in. (5) Calling ‘setState’ causes ‘App’ to re-render and seeing as we now have data available, we render all our components.
As far as API integration goes - that was pretty seemless. We simply created a function, ‘gatherWeather(),’ to make API requests, passed access to the function to ‘App’ using ‘props’, and created a method within ‘App’ responsible for invoking ‘gatherWeather()’ and updating our ‘state’.
Adding Search
With ‘Search’ we could either have ‘Search’ maintain it’s own state or keep it as a stateless component. I’m gonna go with the latter.
We know that when the user clicks on the button ‘Go’ we need to send an API request with the name of the city they typed in. We can do this by doing something similar to what we did to give ‘App’ access to ‘gatherWeather()’. Using ‘props’ we’ll pass through the method ‘getWeather()’ that we recently added to ‘App’. I’m going to add my diagram below that helped me think things through. It probably won’t make sense right away, but it may helpt the rest of the explanation make sense.

React gives us access to event handlers similar to those we normally have access to in HTML. You can find a list of them here. Before even making a call to our API, we need to gather the user’s input. We’ll use the event handler ‘onChange’ to call a function that updates a variable within the ‘Search’ component that stores what the user typed in. As you may have guessed, ‘onChange’ is able to monitor any changes to the value of an input element.
App.jsx
render(){
    return (
        <div>
            <div>
                <Search getWeather={this.getWeather.bind(this)}/>
            </div>
            <div>
                <TodaysWeather today={this.state.todayData} />
                <WeeksWeather week={this.state.weeksData} />
            </div>
        </div>
    )
  }
As for the button click, we can use the event handler ‘onClick’ to monitor when the user clicks on ‘Go’. When the user submits their input, we’ll have React call a function, ‘handleClick()’ that invokes ‘getWeather()’. Remember that we have access to ‘getWeather()’ through ‘props’.
Search.jsx
  var Search = (props) => {
      var val;

      var handleClick = () => {
          props.getWeather(val);
      }

      var getVal = (e) => {
          val = e.target.value;
      }


      return(
          <div id='search' className='clearfix'>
              <input type='text'  placeholder='Type city name here...'  onChange={getVal}/>
              <input type='submit'  value='Go'  onClick={handleClick} />
          </div>
      )
  }
Wait a sec. How can we invoke ‘getWeather’ from within ‘Search.jsx’? It’s important to note that ‘App.jsx’ passed ‘getWeather’ as a callback to be invoked when the user clicked on ‘Go’. ‘Search.jsx’ doesn’t then have it’s own ‘getWeather’ function that it’s calling, we are calling ‘App.jsx’’s ‘getWeather’ method. More importantly, when we passed the ‘getWeather’ callback, we bound it’s context - that is, we made it so that no matter how far down the tree of children ‘getWeather’ gets invoked, the keyword ‘this’ is bound to ‘App’.
If this is confusing, use the browser’s console. Set a breakpoint where ‘getWeather’ is invoked in ‘Search.jsx’ and step into the function. You should see that it takes you to the ‘getWeather’ method within ‘App.jsx’. Without the binding we would get an error saying that it cannot read property ‘getWeather’ of undefined.
Wrap Up
This was a simple app, but hopefully you learned a bit about React from getting a glance at how I went about building it. For starters, while it can take a bit to wrap your head around what React offers and how, it’s clear that it’s a relatively straightforward library. Also, while React offers up some guidelines/best practices, it is ultimately up to you as to how you structure your app and its states.
The benefits I see in using React is that it is well-documented, flexible, allows your apps to be scalable, and is easy to set up.
You can checkout the code here.